Manage Aisles
Aisles in Aisleron represent the categories or locations that a product is organized into within a specific list. This could be an aisle in a shop, or a location in your home. E.g.;
- Shop 1 may have Aisles for Fruit and Vegetables, Aisle 1, Aisle 2, Frozen Foods;
- Home may have Aisles for Bathroom, Fridge, Freezer, Pantry, etc.
To add, edit, or delete a aisle, see the instructions below.
- Expand and Collapse an Aisle
- Add an Aisle
- Add a Product to an Aisle
- Edit an Aisle
- Delete an Aisle
- Assign an Aisle
Expand and Collapse an Aisle
An aisle can be expanded or collapsed by tapping on the aisle name. Expanding an aisle will show the products available under the aisle. Collapsing the aisle will hide all products.
Add an Aisle
To add a aisle, tap the Floating Action Button (fab)  in the bottom right corner, then tap the Add Aisle sub-fab
  to open the Add Aisle dialog.
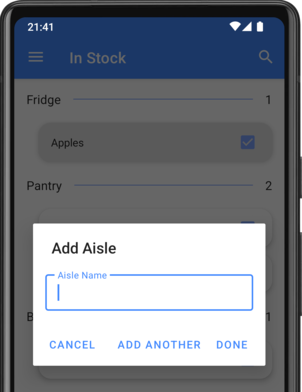
On the Add Aisle dialog, enter a distinct name for the new aisle. Next, tap one of the following options:
- Cancel, to cancel the Add action;
- Add Another, to save the current aisle and add another aisle;
- Done, to save the new aisle and close the Aisle dialog
Once saved, the aisle will be displayed at the bottom of the current list and products can be moved into it.
Add a Product to an Aisle
In addition to dragging products into an aisle, new products can also be added directly to an aisle.
To add a new product directly to an aisle, long-press the aisle, then tap the Add Product icon  in the header bar to open the Add Product page.
Then, add the product as per the Add Product instructions. After saving the product, it will be listed in the selected aisle.
The product will be added to the selected aisle on the current list. It will be listed under No Aisle for all other lists.
Edit an Aisle
To edit an aisle, long-press the aisle, then tap the Edit pencil icon ![]() in the header bar to open the Edit Aisle dialog.
in the header bar to open the Edit Aisle dialog.
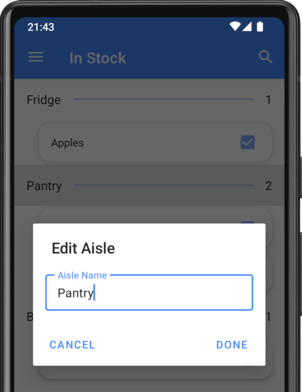
On the Edit Aisle dialog, enter new name for the aisle. Next, tap one of the following options:
- Cancel, to cancel the Edit action;
- Done, to save the updated aisle and close the Aisle dialog
Delete an Aisle
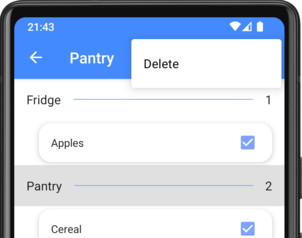
To delete an aisle, long-press the aisle, tap the header bar three-dot menu, then tap the Delete option.
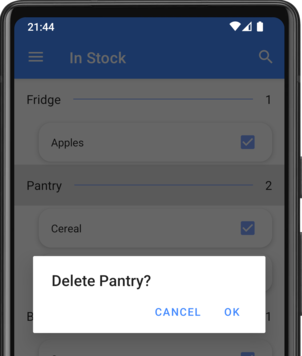
On the Delete confirmation page, tap OK to delete the aisle, or tap Cancel to cancel the delete action.
Assign an Aisle
To assign an different aisle to a product, long-press the product, then tap the Aisle picker icon ![]() in the header bar to open the Aisle Picker dialog.
in the header bar to open the Aisle Picker dialog.
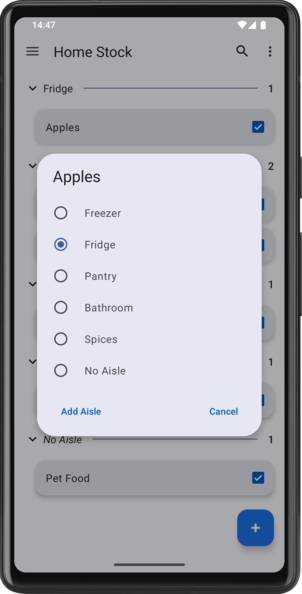
The Aisle Picker dialog has the following options:
- Aisle list, to pick an existing aisle that the product will be assigned to. The dialog will close automatically after selecting an aisle.
- Add Aisle, to create a new aisle and assign the product to this new aisle.
- Cancel, to close the Aisle Picker dialog without selecting a new aisle.